The NFL Draft Content Blueprint Every Sports Creative Needs (But No One Shares)
A tactical playbook for creatives looking to scale NFL Draft graphics with speed, structure, and storytelling.
If I worked in sports again, how would I approach NFL Draft planning as a designer?
The NFL Draft is a highly anticipated event for creatives. As a designer, you may create digital content to promote your team or clients and engage fans. This can include social graphics, website banners, newsletters, and more. It's important these graphics maintain visual identity across platforms. Building scalable templates that allow fast changes can help efficiently create stunning graphics amidst the flurry of drafted players.
Whether you're working with a small team or facing a large volume of players, I’ll cover what I (personally) would do if I was working on a sports creative team again by: 1) Exploring the best approaches to building and exporting your project documents, and 2) Suggesting the best methods for scaling design structures to meet the needs of your final asset outputs.
Let’s get started!
“If I was working on a sports creative team again, how would I approach planning the delivery of static draft content, across multiple platforms?”
Here are two core points to consider:
Designs should be: low-fidelity → high-quality “programming” (content scheduling/delivery)
Utilize standardized templates and branding
Prioritize speed + turnaround time
Text info should be: cohesive + focused
What is focus and how do you deliver?
The subject (athlete) → The destination → The selection (round + pick)
Let’s use this template I made back in 2021 as an example:
Consistent and cohesive template look across social sizes
Editable variable attributes
Logo container
Text (Round + Team Name)
Setting Up Layers in a Template
Naming your layers (yes, you heard me right) and layer semantics are extremely important when building out templates, especially if you are distributing the file to others. It is also important if you want to take advantage of the Variables panel to simultaneously toggle layers across different artboards.
Here are some semantic patterns I use when building templates that may involve utilizing the Variables panel:
Layer Name Semantics
Using [] for layers that require Text Replacement
Using () for layer visibility control
Using {} for layers that require Pixel Replacement
It distinguishes the variable types you would like replacement control over vs. static layers.
In this case, using brackets "[ ]" to create this distinction
The Variables Panel
Variables are a powerful feature that allow you to create multiple variations of a design or image using a single template. Variables are placeholders within a document that can be associated with data from a spreadsheet or a text layer. When you use variables, you can automatically generate multiple versions of a design by replacing the variable content with data from your dataset. Once you have your template ready, go to the "Image" menu and choose "Variables" > "Define".
You can find the Variables panel by selecting the menu option:
Image -> Variables -> Define
Here's how variables work:
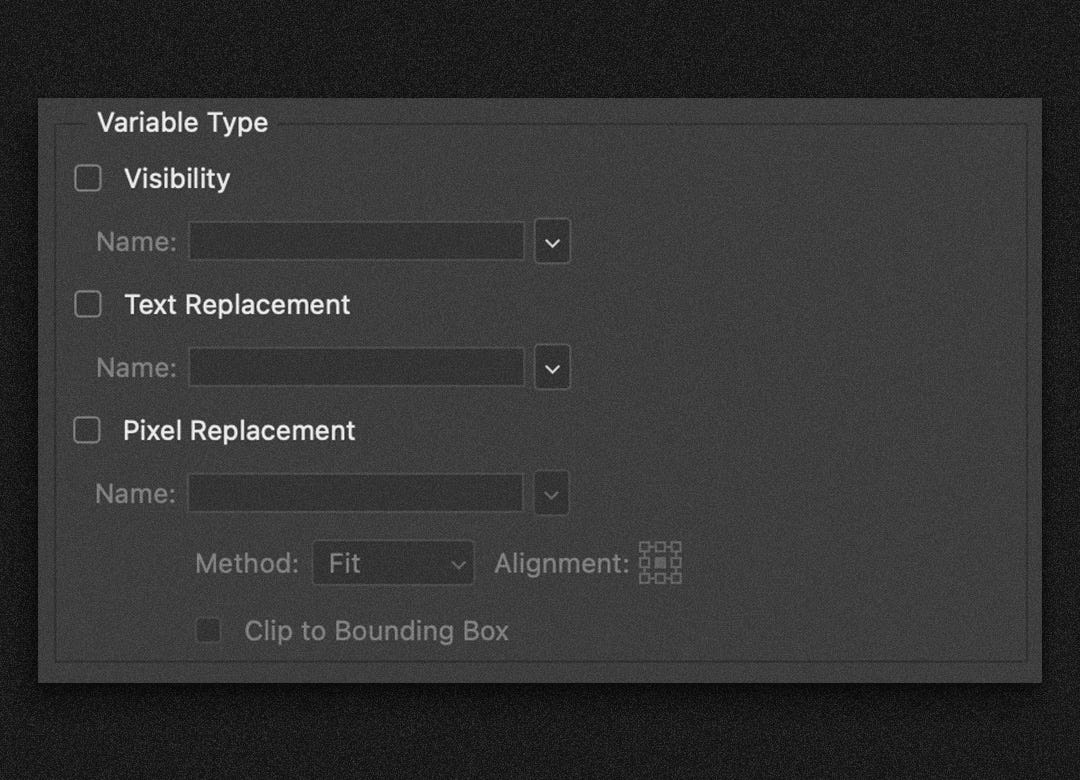
There are three main layer types that can be controlled by variables:
Layer Visibility
With visibility variables, you can control the visibility of different layers or layer groups in your design. This allows you to create variations of your design with different layer combinations visible or hidden.
Text Replacement
These allow you to define text elements in your design that can be automatically replaced with different values. For example, you can create a text variable for a player name, and generate multiple versions of your design, each with a different player name.
Pixel Replacement
Using a pixel replacement is less common, but a good example of a way to quickly switch out different images from artboards.
Variables help streamline the design production and save time by automating repetitive tasks. Using the layer naming conventions from above, you can quickly scroll through the list of layers and define your variables.
Defining your Variables
NOTE: When you define your variables, make sure to type in the same exact name as the layer, minus the naming convention used to indicate the variable type. Carry this consistent name across all artboards
Select the layer(s) with the brackets and add a word/text string that you would like to control the variable types with.
In this case, the Control Names were the same as the team (for organizational purposes).
Ex: [Washington Football Team] -> "Washington"
Creating Data Sets
The final step to controlling layer visibility is by creating new data sets.
Select the 'New Data Set' icon to create controls from variable value names
Summary
The workflow above is a great example of how to set up your templates if you have a handful of documents to work across. Here’s a recap: to plan the delivery of static draft content for multiple platforms, prioritize speed and turnaround time. Use standardized templates and branding to maintain a consistent look, and take advantage of variables to streamline production. By defining variables, you can create controls from variable value names and automate repetitive tasks.
How to use Smart Objects to quickly replace Text and Images on a Template
By using Smart Objects, you can easily update text and images in a design template without affecting the overall layout or quality of the original file. This method saves time and effort, particularly when working with multiple templates or making frequent modifications to your designs.
1. Creating a Smart Object
To create a Smart Object, select the desired layers in the Layers panel, right-click on them, and choose "Convert to Smart Object." Creating a Smart Object preserves the original content and enables non-destructive editing while maintaining flexibility for future updates. Look for the layer containing the element you wish to modify, such as text or an image. In the layer panel, you might notice a special icon next to the layer thumbnail. This icon indicates that the layer is a Smart Object.
2. Edit the Smart Object
Double-click on the Smart Object layer. This action will open a new window that contains the content of the Smart Object.
3. Modify the content
In the new window, you can modify the content of the Smart Object. For example, if the Smart Object contains text, you can change the text by selecting and typing new text. If the Smart Object contains an image, you can replace it by pasting or importing a new image.
4. Save the changes
After you've made the desired modifications, save the changes to the Smart Object. Use the appropriate option in the menu to save the changes you made to the Smart Object. Note that this step may differ slightly depending on the software you are using.
5. Update the main template
Once you have saved the changes to the Smart Object, close the window containing the Smart Object content. You'll notice that the original document now reflects the changes you made in the Smart Object.
Other Applications using this Technique → Motion Design
The idea of building a pre-defined scalable system from a dropdown isn’t new, and this video above is a perfect example of how Justin Law found a way to leverage it during his Draft content prep a few years ago!
Recap
If you’re passing off a template to a team member to edit or if you want to quickly make changes to a template that involves logos and text, using a smart object across multiple artboards is a great alternative to the Variables panel, with the flexibility to edit the instances that show up in the document. Smart objects are quick and easy to create, and can be easily copied to fit the same source reference.


